Web Interface
Overview
EC3 as a Service (EC3aaS), is a web service offered to the community to facilitate the usage of EC3 to non-experienced users. The EC3 portal integrated in the EGI Application on Demmand can be accessed by users of the vo.access.egi.eu VO (read EGI AoD documentation to get more information). The users are enabled to try the tool by using the user-friendly wizard to easily configure and deploy Virtual Elastic Clusters on EGI Cloud Compute or HelixNebula Cloud (powered by Exoscale) resources. The user only needs to choose the Cloud provider and allow EC3 to provision VMs on behalf of the user.
Initial Steps
The first step to access the EC3 portal is to autenticate with your EGI CheckIn credentials. Once logged you will see on the rigth-top corner the obtained full name. These credentials will be used to interact with EGI Cloud Compute providers. Then the user, in order to configure and deploy a Virtual Elastic Cluster using EC3aaS, accesses the homepage and selects “Deploy your cluster!” (Fig. 1). With this action, the web page will show different Cloud providers supported by the AoD web interface version of EC3: EGI Cloud Compute or HelxNebula Cloud.
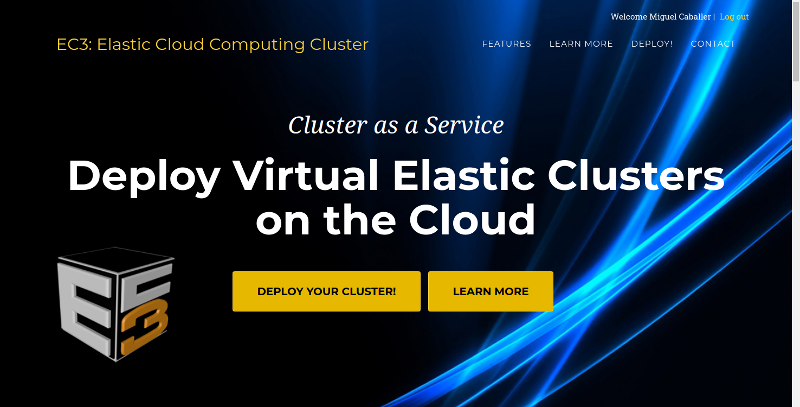
Fig 1. EC3aaS homepage.
The next step, then, is to choose the Cloud provider where the cluster will be deployed (Fig. 2).
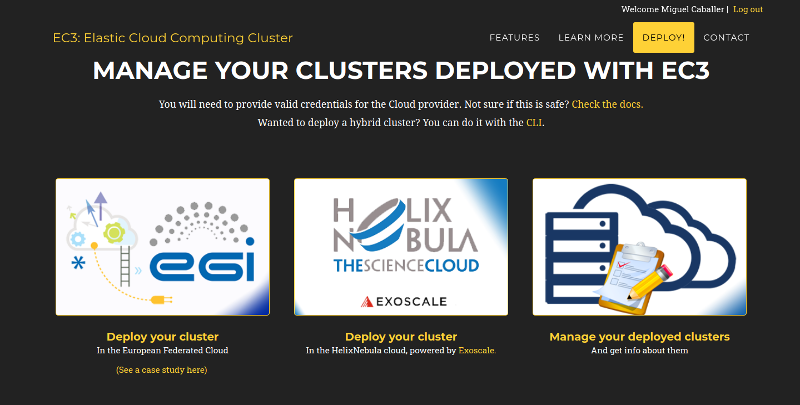
Fig 2. List of Cloud providers supported by EC3aaS.
Configuration and Deployment of a Cluster in EGI Cloud Compute
When the user chooses the EGI Cloud Compute provider a wizard pops up (Fig. 3). This wizard will guide the user during the configuration process of the cluster, allowing the selection of the Cloud site where the VMs will be deployed, the operating system, the type of LRMS system to use, the characteristics of the nodes, the maximum number of cluster nodes or the software packages to be installed.
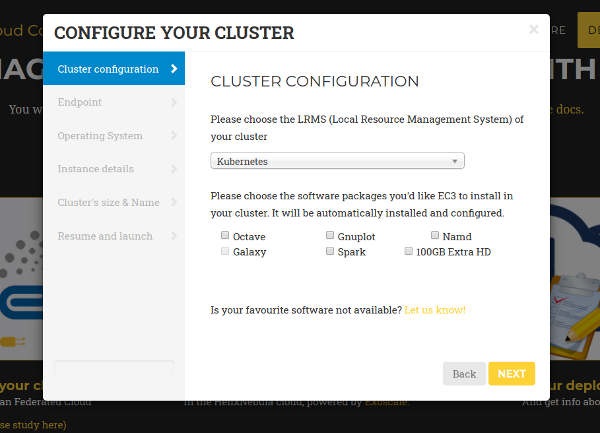
Fig 3. Wizard to configure and deploy a virtual cluster in EGI Cloud Compute.
Specifically, the wizard steps are:
- Cluster Configuration: the user can choose the Local Resource Management System preferred to be automatically installed and configured by EC3. Currently, SLURM, Torque, Grid Engine, Mesos (+ Marathon + Chronos), Kubernetes, ECAS, Nomad and OSCAR are supported. Also a set of common software packages is available to be installed in the cluster, Spark, Galaxy (only in case of SLURM clusters), GNUPlot or Octave. EC3 will install and configure them automatically in the contextualization process. If the user needs another software to be installed in his cluster, a new Ansible recipe can be developed and added to EC3 by using the CLI interface.
- Endpoint: the user has to choose one of the EGI Cloud Compute sites that provides support to the vo.access.egi.eu VO. The list of sites is automatically obtained from the EGI AppDB information system. In case that the site has some errors in the Argo Monitoring System a message (CRITICAL state!) will be added to the name. You can still use this site but it may fail due to this errors.
- Operating System: the user chooses the OS of the cluster from the list of available Operating Systems that are provided by the selected Cloud site (also obtained from AppDB).
- Instance details: the user must indicate the instance details, like the number of CPUs or the RAM memory, for the front-end and also the working nodes of the cluster (also obtained from AppDB).
- Cluster’s size & Name: here, the user has to select the maximum number of nodes of the cluster (from 1 to 10), without including the front-end node. This value indicates the maximum number of working nodes that the cluster can scale. Remember that, initially the cluster only is created with the front-end, and the nodes are powered on on-demand. Also a name for the cluster (that must be unique) is required to identify the cluster.
- Resume and Launch: a summary of the chosen configuration of the cluster is shown to the user at the last step of the wizard, and the deployment process can start by clicking the Submit button (Fig. 4).
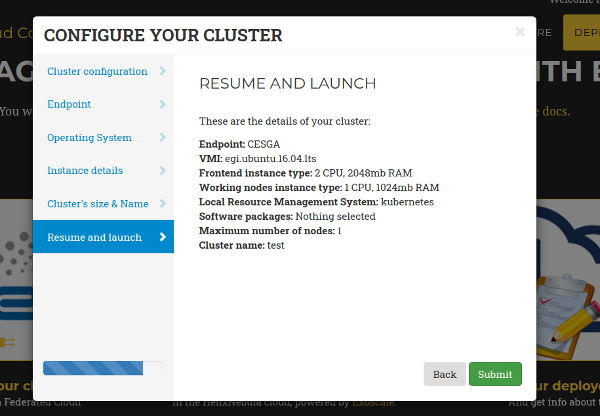
Fig 4. Resume and Launch: final Wizard step.
Finally, when all the steps of the wizard are fulfilled correctly, the submit button starts the deployment process of the cluster. Only the front-end will be deployed, because the working nodes will be automatically provisioned by EC3 when the workload of the cluster requires them. When the virtual machine of the front-end is running, EC3aaS provides the user with the necessary data to connect to the cluster (Fig. 5) which is composed by the username and SSH private key to connect to the cluster, the front-end IP and the name of the cluster.
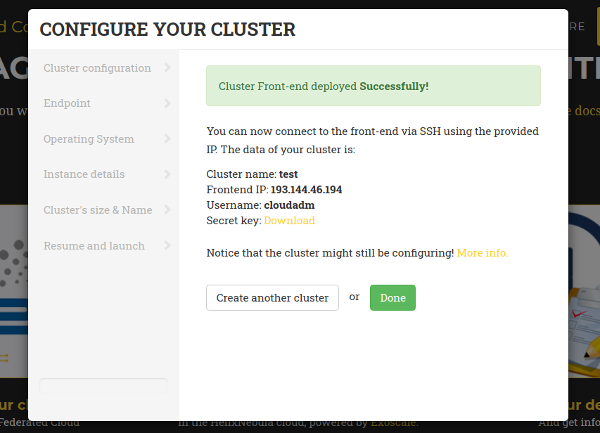
Fig 5. Information received by the user when a deployment succeeds.
The cluster may not be configured when the IP of the front-end is returned by the web page, because the process of configuring the cluster is a batch process that takes several minutes, depending on the chosen configuration. However, the user is allowed to log in the front-end machine of the cluster since the moment it is deployed. To know if the cluster is configured, the command is_cluster_ready can be used. It will check if the configuration process of cluster has finished:
user@local:~$ssh -i key.pem <username>@<front_ip>
ubuntu@kubeserverpublic:~$ is_cluster_ready
Cluster configured!
If the the command is_cluster_ready is not found it means that the cluster is already being configured.
Notice that EC3aaS does not offer all the capabilities of EC3, like hybrid clusters or the usage of spot instances. Those capabilities are considered advanced aspects of the tool and are only available via the EC3 Command-line Interface.
Configuration and Deployment of a Cluster in HelixNebula Cloud
In case of HelixNebula Cloud, the wizard is the same shown for EGI Cloud Compute but it has an additional step after “Cluster Configuration”. In the “Provider Account” step (Fig. 6) the user must provide the API key and Secret Key of the Exoscale cloud. To get them, follow the steps described in the Exoscale Vouchers for AoD documentation.
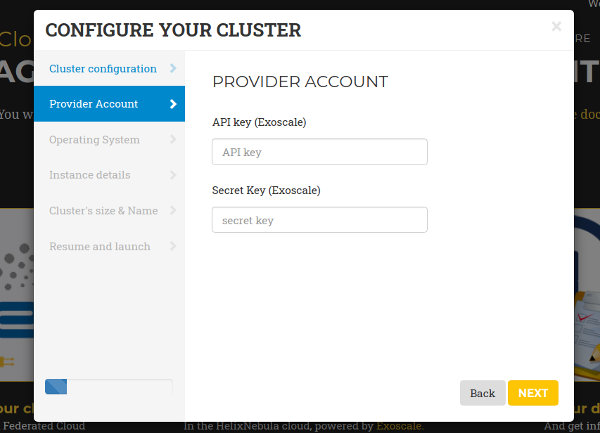
Fig 6. Helix Nebula Provider Cccount wizard step.
Management of deployed clusters
You can get a list of all your deployed clusters choosing the “Manage your deployed clusters” option (right in Fig. 2). It will show a list with the details of the clusters launched by the user. The list will show the following information: Cluster name (specified by the user on creation), the state, front-end public IP, number of working nodes deployed. It will also enable the user to download the SSH private key needed to access the front-end node and the contextualization log to see all the configuration steps performed. This log will enable the user to verify the currect status of the configuration of the cluster, and check for errors in case that the cluster is not correctily configured (unconfigured state). Finally it also offers a button to delete the cluster.
When the deletion process finishes successfully, the front-end of the cluster and all the working nodes had been destroyed and a message is shown to the user informing the success of the operation. If an error occurs during the deleting process, an error message is returned to the user.
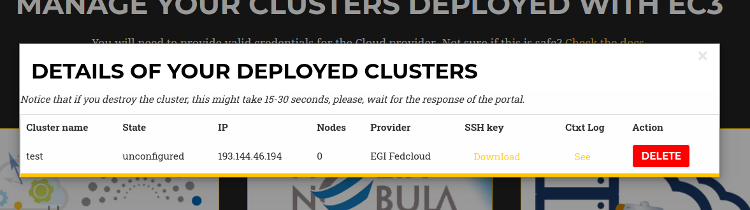
Fig 7. List of Clusters deployed by the active user.